How to perform Self-Paced Saccades

By Dr Liz Fuemmeler

The Self-Paced Saccades (SPS) test is available in VisualEyesTM 525 as an optional test to include in your test battery. This test was not added to the default VisualEyes 525 protocol, as not all patient populations may benefit from this advanced oculomotor assessment.


Protocol setup

To add Self-Paced Saccades to your protocol, go to "System Default Settings" > "Protocol Management". Click "Add Test" > "Default" and choose "Self-Paced Saccades" to add to your desired protocol. After this has been added to the protocol, you should see the Self-Paced Saccades test in your test menu.
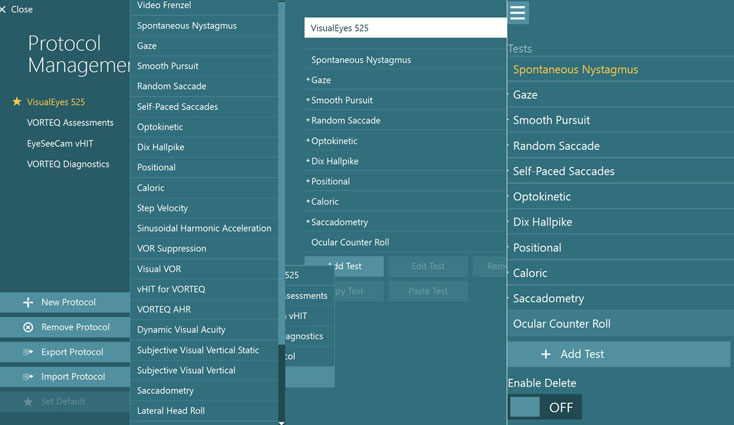
 

Figure 1: Selecting Self-Paced Saccades from the default menu (left) and example of the SPS test showing up in the test menu (right).


Under protocol management or under temporary settings, you can adjust the target position and duration of the test. The default is 15 degrees for 30 seconds.
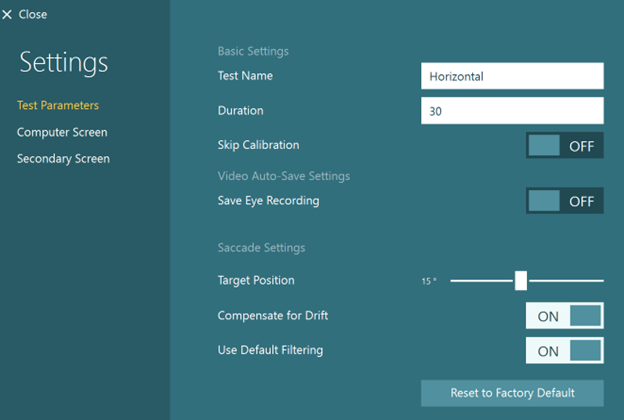
 

In addition to the 15 degrees for 30 seconds, the following options are available to toggle on or off. Skip calibration, save eye recording, compensate for drift, and use default filtering.
Figure 2: Customizable settings for the Self-Paced Saccades test.


You can also add the SPS test if you click "Add Test" from the test menu in a session. This will not add SPS to the permanent protocol for your software, but only the specific session for that patient.
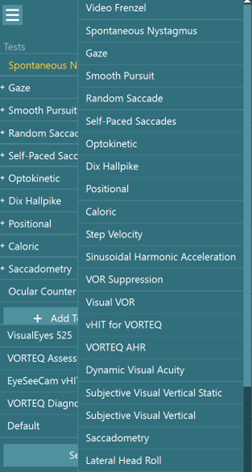
 

Figure 3: To add the Self-Paced Saccades test to a session, click "Add Test" and select the test from the Default protocol list.


How to perform the Self-Paced Saccades

After you have added the test to your test or session protocol, choose the test from the test menu. Instruct the patient to move their eyes back and forth between the two targets as many times as possible within 30 seconds. The test defaults to two horizontal targets, set at 15 degrees to the right and left. The test can also be performed vertically.
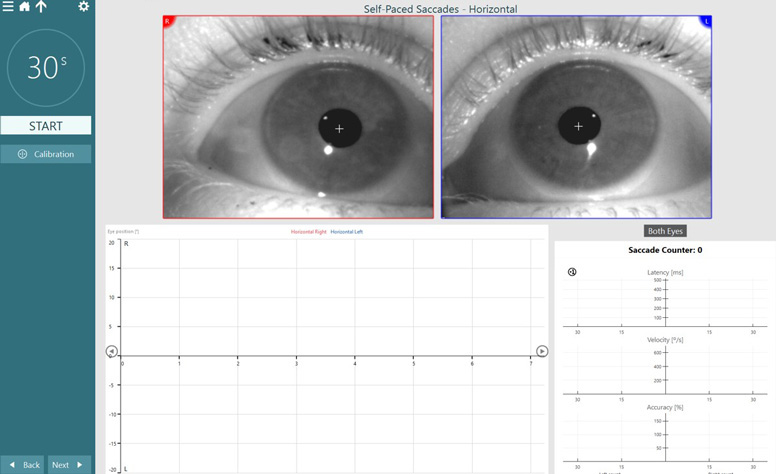
 

Several graphs are on this screen, all as a function of time. Eye position, latency, velocity, and accuracy.
Figure 4: Self-Paced Saccades test screen.


Before the test begins, the patient will see a center target. After you press start, the patient will see the following screen:
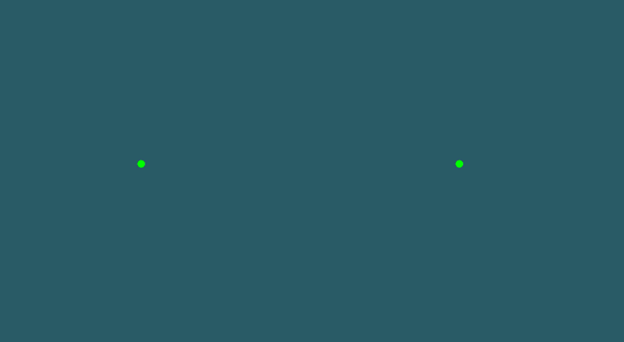
 

The stimuli are two green dots toward the left and the right on a dark teal screen.
Figure 5: Patient stimuli screen during the SPS test.


SPS results and exporting

Following completion of the test, you will have four measurement parameters. Three of these are familiar and present in other saccade tests: Latency, Velocity, Accuracy. One parameter is unique to the SPS test: Saccade Counter. This is the number of completed saccades (eye movements) throughout the test.

There is an option to review the numerical results following the test. This data can be viewed from both eyes, right eye, or left eye.
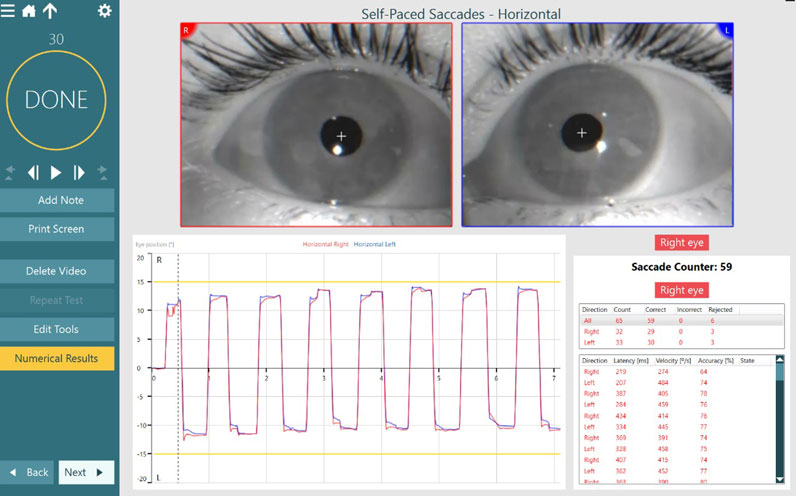
 

In this example, the saccade counter is displaying the results for the right eye. There are two data charts. The first has five columns which sum up the total amount of saccades when it comes to direction, count, correct, incorrect, and rejected. The second chart displays the results for each individual saccade, including direction, latency, velocity, and accuracy.
Figure 6: Numerical results view following the SPS test.

Presenter

Dr Liz Fuemmeler

Dr Liz Fuemmeler

Dr. Liz Fuemmeler is the Balance Clinical Product Manager with Interacoustics and Vestibular Program Director at Professional Hearing Center in Kansas City, MO. She graduated with her Doctorate of Audiology in 2019 from Purdue University and received specialty training in vestibular and balance disorders at Boys Town National Research Hospital and the Mayo Clinic. She is actively involved in vestibular and concussion research and regularly lectures for local, national, and international conferences. Outside of her role with Interacoustics, she co-hosts a monthly podcast called "A Dose of Dizzy'' that reviews current vestibular protocols and research. She also is the past-president of the Missouri Academy of Audiology and volunteers with the American Academy of Audiology.
Available Training

How to perform the Active Head Rotation test

Learn how to perform the active head rotation (AHR) test in the VisualEyesTM software.

Dr Michelle Petrak2026-10-02

How to perform the Advanced Dix-Hallpike test

In this guide, you will learn how to perform the Advanced Dix-Hallpike using the VisualEyesTM videonystagmography (VNG) system.

Dr Michelle Petrak2026-10-02

How to perform the Brandt-Daroff Exercise

Click here to learn how to perform the Brandt-Daroff Exercise.

Interacoustics2026-10-02

How to perform calibration procedures

In this guide, you will learn how to calibrate the VisualEyesTM videonystagmography (VNG) system.

Dr Michelle Petrak2026-10-02

How to perform the Caloric test

Learn how to perform the caloric test with videonystagmography (VNG) equipment.

Interacoustics2026-10-02

How to perform Cervical Gaze testing

Two additional gaze positions are now available in VisualEyesTM 525 as an option to include in your test battery: Center Body Left and Right. Learn more.

Dr Liz Fuemmeler2026-10-02

How to perform the Dix-Hallpike test

Learn how to perform the Dix-Hallpike test, including precautions, patient instructions, the step-by-step test procedure, results interpretation, and more.

Interacoustics2026-10-02

How to perform the Dynamic Visual Acuity (DVA) test

Learn how to perform the dynamic visual acuity (DVA) test in the VisualEyesTM software.

Dr Michelle Petrak2026-10-02

How to perform the Epley Maneuver

Learn how to perform the Epley Maneuver for treatment of posterior canal BPPV. Includes a step-by-step procedure with images and helpful hints. Read more.

Interacoustics2026-10-02

How to use VisualEyesTM EyeSeeCam

In this guide, you will learn how to use the EyeSeeCam vHIT software within the VisualEyesTM videonystagmography (VNG) system.

Dr Michelle Petrak2026-10-02

How to perform the Functional Vision Head Impulse Test (fvHITTM)

The Functional Vision Head Impulse Test (fvHITTM) provides functional information on how clearly the patient sees in response to quick head impulses. Read more.

Dr Liz Fuemmeler2026-10-02

How to perform the Gaze test

Learn how to perform the gaze test with videonystagmography (VNG) equipment.

Interacoustics2026-10-02

How to perform the Gaze Stabilization Test (GST)

Learn how to perform the Gaze Stabilization Test (GST) in the VisualEyesTM software. Click here to read more.

Dr Michelle Petrak2026-10-02

How to perform the Gufoni Maneuver

Learn how to perform the Gufoni Maneuver in this short guide. Includes a step-by-step procedure with images and helpful hints. Read more.

Interacoustics2026-10-02

How to set up and troubleshoot monitors for oculomotor and optotype tests

In this quick guide, you will learn how to set up and troubleshoot monitors for oculomotor and optotype tests in the VisualEyesTM software. Read more.

Dr Liz Fuemmeler2026-10-02

How to use keyboard shortcuts in VisualEyesTM

VisualEyesTM has several software functions that are available through a computer keyboard. These allow for the user to access quick buttons for easy navigation.

Dr Liz Fuemmeler2026-10-02