
How to Use Affinity Compact's Probe Placement Indicator

By Rasna Kaur Mistry, BSc (Hons) Audiology

In this quick guide, you'll learn how to use the Probe Placement Indicator in the Affinity Compact software.

The importance and challenges of probe tube placement

Probe tube placement is critical when performing real-ear measurements (REMs), as it serves as your point of reference for all the measurements you'll perform. To ensure accurate REMs, you need a correct probe tube insertion depth.

REM is the 'gold standard' of hearing aid fitting and whilst otoscopy and probe tube markers can help, it can still be challenging to place the probe tube correctly and avoid contact with your client's ear drum. For this reason, the Affinity Compact software provides you with the option of using the Probe Placement Indicator.

Please note: The Probe Placement Indicator was developed and validated for adults with normal outer and middle ear function. Use with other patient populations is not advised.

What is the Probe Placement Indicator?

The Probe Placement Indicator is based on machine learning and assists you with probe tube placement. It works by tracking the probe tube insertion depth in real time. The software provides a visible and audible signal when you've inserted the probe tube at the correct depth, within 5 mm of the ear drum.

The two main benefits are:

  1. You avoid any contact with your client's ear drum
  2. You know you're performing accurate REMs
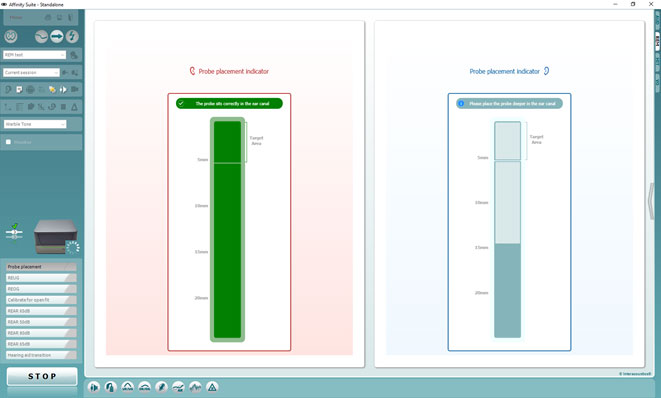
Screenshot of Probe Placement Indicator in the Affinity Suite. The bar for the right ear is green, showing that the probe tube insertion depth is correct. The bar for the left ear shows the probe tube insertion depth is incorrect.
Screenshot of Probe Placement Indicator.

Procedure for probe tube placement

Before starting the procedure, make sure you've added the Probe Placement Indicator to your REM test battery. Also, make sure to turn on your PC speaker(s), so you can hear the audible signal.

Step 1: Otoscopy

Perform otoscopy to rule out any contraindications to placing a probe tube.

Step 2: Start the test

Select 'Probe placement' and press 'START'. This will present a noise stimulus.

Step 3: Insert the probe tube

Start inserting the probe tube into your client's ear. Once the probe tube is within 5 mm of your client's ear drum, the bar will turn green, and you'll hear a chime from your PC speaker. Click 'STOP' once you've achieved the correct probe tube depth.

Incorrect insertion depth

If you haven't inserted the probe tube at the correct depth, a message will show that you need to place the probe tube deeper. Continue the measurement by pressing 'START'.

When measuring binaurally

If you're measuring binaurally, the right ear will start first. Once you've achieved the correct depth in the right ear, you need to press 'CONTINUE' to proceed with the left ear. Proceed as per Step 3.

Step 4: Observe probe tube insertion depth with otoscopy and black marker

Observe the probe tube placement with an otoscope once complete. The probe tube should be within 5 mm of the ear drum.

Observe where the black marker on the probe tube sits. This should be near the pinna's intertragal notch. Use the black marker as a reference point if the probe tube moves during later measurements.

Presenter

Rasna Kaur Mistry, BSc (Hons) Audiology

Available Training

Acceptable Noise Level (ANL) Test

Learn how to perform the acceptable noise level (ANL) test with the Affinity Compact.

Interacoustics2026-10-02

AC440 Protocol Setup

Learn how to set up protocols in the Affinity Compact's audiometry module.

Interacoustics2026-10-02

Adult Hearing Aid Verification

Learn how to verifiy hearing aids in adults with the Affinity Compact, using real ear measurements (REM).

Interacoustics2026-10-02

Affinity Compact: A product introduction

This video provides an introduction to and overview of the Affinity Compact.

Interacoustics2026-10-02

Affinity Compact: Features and functions

This video provides an overview of the Affinity Compact's features and functions.

Dennis Mistry2026-10-02

Ambient Noise

Worried about noise in your audiometry recordings? Affinity Compact has an Ambient Noise feature, which allows you to monitor for noise in the test environment.

Interacoustics2026-10-02

IA-AMTAS

Learn about the IA-AMTAS feature in Affinity Compact for automated audiometry testing.

Interacoustics2026-10-02

Basic Audiometry

Learn how to do basic audiometry with the Affinity Compact.

Interacoustics2026-10-02

BKB-SIN speech-in-noise test

In this quick guide, you will learn how to use the BKB-SIN speech-in-noise test provided with the Interacoustics Affinity Compact audiometer. Read more.

Interacoustics2026-10-02

How to perform CROS and BiCROS fitting

Learn how to fit CROS and BiCROS hearing aids with the Affinity Compact.

Interacoustics2026-10-02

Customized Printout Setup

Learn how to customize printouts with the Affinity Compact.

Interacoustics2026-10-02

Delta Values

To make hearing aid fitting easier, the Delta Values feature calculates the difference between your measurement curve and your target curve. Learn more here.

Interacoustics2026-10-02

How to perform FM transparency verification

In this Affinity Compact quick guide, you'll learn how to perform FM transparency verification. Read more.

Interacoustics2026-10-02

Free Field Adjustment

Learn about Affinity Compact's free field adjustment feature, which ensures your free field speaker is properly calibrated, no matter the sound environment.

Interacoustics2026-10-02

How to perform frequency lowering verification

In this Affinity Compact quick guide, you'll learn how to determine if you should apply frequency lowering and how to verify the frequency lowering feature.

Interacoustics2026-10-02

Hearing Aid Transition (HAT)

Learn about the hearing aid transition test, which allows you to copy tuning preferences from hearing aids which you do not have previous sessions stored for.

Interacoustics2026-10-02
Affinity Compact | Probe Placement Indicator | Interacoustics