
Visible Speech Mapping
Verification of the hearing aid fitting is a very important part of the fitting process. To try to make this process a bit easier, rather than using traditional real-ear measurements, hearing care professionals can use the Visible Speech Mapping modules in the Affinity Suite. Visible Speech Mapping is an intuitive tool which helps hearing care professionals better explain the benefits of amplification.
Getting started
Speech Mapping is a Real Ear Aided Response (REAR) measurement; therefore the same equipment that is needed for a REAR is also needed. To start, follow the steps below.
- Launch the Affinity Suite through your patient management system, Noah, OtoAccess® or Standalone.
- Enter/Select an audiogram from Noah or from the AUD module (if using Standalone). If no audiogram is entered or selected, no targets will be displayed.
- Launch the REM module by clicking on the REM tab.
- Connect the REM headset to the Affinity hardware.
- Connect a probe tubes to the REM reference microphones.
- Click on the Tube Calibration button
 and follow the instructions on the screen.
 - Position the patient approximately 0.5 meters from the REM loudspeaker.
- Perform otoscopy to ensure the ear canal is clear.
- Snap the REM headsets on the REM headband and place on patient's ear.

Measurement steps
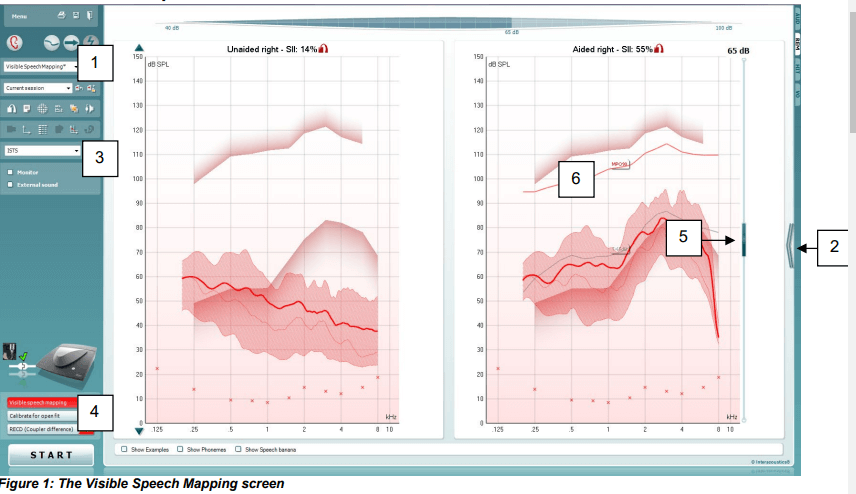
- Choose the Visible Speech Mapping protocol from the drop down menu.
- Choose the appropriate options with in the Fitting Prescription Settings window, which will appear automatically when the Speech Mapping protocol is chosen
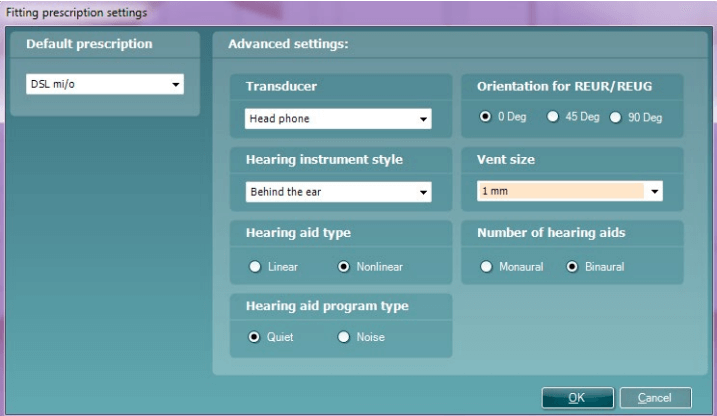
The fitting formula can also be changed by expanding the "advanced view" option (#2 above). - To verify the fitting, select the ISTS signal (to use a calibrated speech-like signal for verification).
- Click on the Visible Speech Mapping button at the bottom left of the screen. If using an Open Fitting configuration, click on the "Calibrate for Open Fit" before proceeding with verification.
- Click on the slider to adjust the input level of the ISTS signal; suggested start level is 65 dB SPL. Click START.
- Repeat step 5 using soft and loud levels; suggested levels are 50-55 dB SPL and 75-80 dB SPL, respectively.
- Change the Input signal to Warble Tone. Using the slider (Figure 1, number 5) to increase the level of the signal to 90. Click START to measure the MPO.
NOTE: If choosing DSLv.5, the MPO targets will automatically appear, since the UCL thresholds are always predicted from the audiogram. If choosing NAL-NL1 or NAL-NL2, the UCL thresholds need to be entered in the audiogram screen for the MPO targets to be generated. - Fine tune the hearing aid if necessary, to match the target. Use the On Top mode button
 to minimize the REM screen and to bring it "on top" of the hearing aid manufacturer software.
 - Counsel the patient, using the tools described below
Counseling elements in Visible Speech Mapping
1. The Speech Spectrum
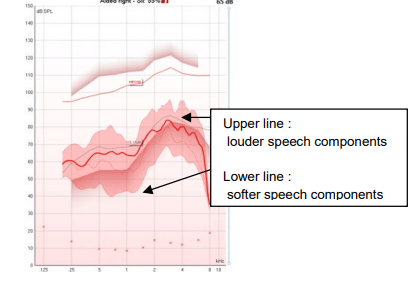
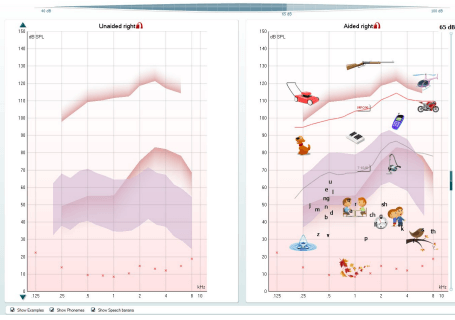
Used to counsel regarding audibility. For example: showing the patient that soft sounds (lower line on image to the left) are below the thresholds could help counsel on expectations of hearing aid performance. It could also help HCPs demonstrate the effects of fine tuning the hearing aid.
2. Using Live Speech Mapping or Environmental sounds
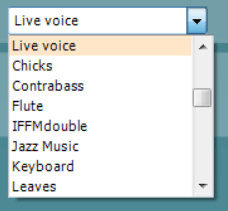
- Select the "Live Voice" feature to demonstrate the effects, benefits and limits of amplification
- Use a whisper to show how the hearing aid reacts to it
- Ask the significant other to stand far away from the hearing instrument user and talk; this helps demonstrate some of the limits of the hearing instrument
- Play environmental sounds to demonstrate how they sound with the hearing aid
3. Counseling overlays
- Use visuals to help explain the hearing loss to patients
- Adding visual information helps understanding of amplification and hearing loss
- Choose from "Familiar Sounds" examples, Phonemes and Speech Banana
4. Unaided vs Aided
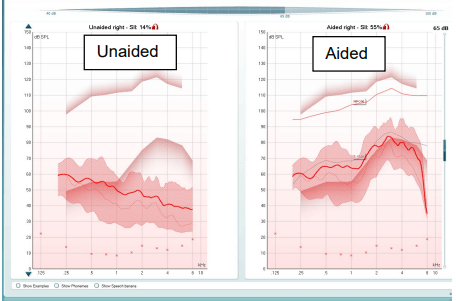
- Easily visually demonstrate the difference between unprocessed vs processed/amplified sound
- Can demonstrate the effect of adaptive hearing aid features
- Frequency Shifting
- Noise reduction
5. Speech Intelligibility Index
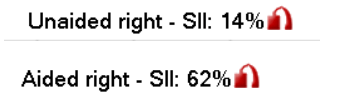
Use this to visibly show, using a percentage, improvement in speech intelligibility from unaided to aided.
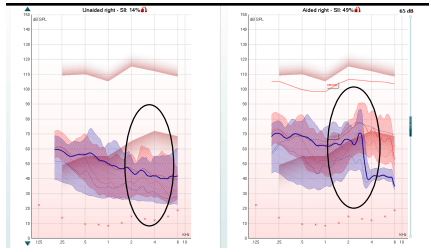
Adaptive Feature example 1: Demonstrating Frequency Shifting.
- Red curve: Unaided vs Aided, normal amplification
- Blue curve: Unaided vs Aided after activating a frequency shifting algorithm
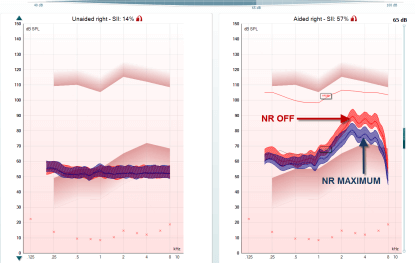
Adaptive feature example 2: Demonstrating Noise Reduction.
- Red Curve: Unaided and Aided with Noise Reduction feature OFF
- Blue Curve: Unaided and Aided with Noise Reduction feature set to MAX
6. Dynamic range
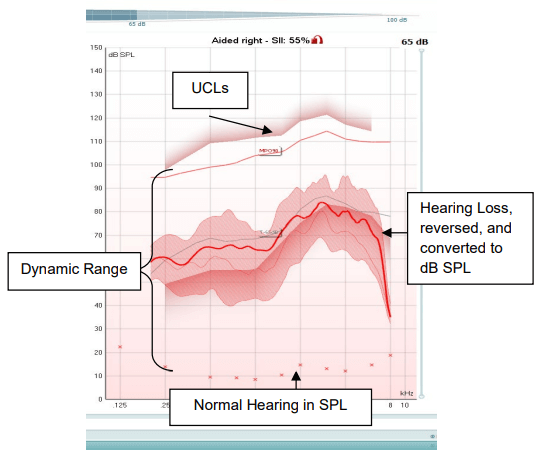
- The dynamic range is the range between the softest sound the ear can detect and the loudest sound the ear can tolerate (thresholds and UCLs)
- Use the Speech Mapping graph to explain the consequences and limitations of narrowed dynamic ranges
- Demonstrate the difference between a normal dynamic range (normal hearing to UCL) and a narrowed dynamic range (hearing loss to UCL)
Presenter